Tuesday, November 25, 2008

MSF Basic RiderCourse

I took the $280 15 hour Motorcycle Safety Foundation (MSF) course this past weekend at Arizona Honda.

[Purchased the day before the course.]

And picked up my motorcycle endorsement a day later at the DMV.

Surprisingly, unlike other places, there is no progressive engine capacity restriction in the United States. And you don't even have to take this excellent course, so bad habits etc. might not get corrected. I say: what a country!

Motorcycle skills take time to acquire. Maybe a lifetime to perfect. So I'm looking to get a beginner machine and work my way up.

The classroom study led by the instructor (5 hours) is of course just common sense sound advice. No tricks. 50 questions on the exam. I believe there were 10 people in my class. I think there were only two wrong answers in the whole group, i.e. the class scored 498/500.

Out on the range, it was a bit less straightforward. I drive a stick shift car and I have ridden a road bike for many years. So I'm very familiar with the principles. But that's all theoretical, I've never actually ridden a motorcycle before. Muscle memory-wise, it was both harder and easier than I'd imagined.

Glancing at the MSF webpage,there's about 10 hours of practice exercises and a 4-part test. There were two instructors, euphemistically referred to as "RiderCoaches". Our group of 10 were divided between them for instant feedback aka "coaching".

It is quite grueling actually if you think about it since the total time spent (excluding travel time) is 15 hours over just 2 days. It's still fairly hot and dry out here in Tucson in late November (28C), lots of water needed, and we finished each day just as the sun was setting.

[Waiting to be called to review our tests at the end of day 2.]

(Unfortunately,) you get to use the same bike on both days:

I truly hated my Honda Rebel. It wouldn't go into neutral unless I used the kill switch, and randomly balky into 2nd. Pretty sensitive throttle with a lot of slop. I guess these range bikes were a little beat up.

Moreover, I disliked the ergonomics of the Rebel. I could not reach the front brake with all four fingers (required), and the lever's reach was not adjustable. The seat was painfully wide, seemingly designed for a wide load only. The handlebar height was wrong for maintaining a horizontal/straight wrist. Seat height was commendably low though.

The instructors (Ray and Ron) were truly excellent though. Serious and professional. I got my money's worth. They jumped on errors immediately, hammered me mercilessly for every sign of an emerging bad or sloppy habit, spotted every moment of throttle hesitation or roll-off through a corner, and critiqued every wobble no matter how small. (My biggest problem turned out to be looking down: either at the controls or the cones - especially during the slower-than-walking-pace small box double u-turn maneuver.) I can't imagine learning anywhere near this fast on a cul-de-sac somewhere and of course bad habits would have developed unchecked in that case.

By contrast, the test for the license (at the end of the 2nd day) is rather hard to flunk. You have to have more than 20 points deducted or drop the bike to fail. But that's not the point. Over the two days, I had gone from zero to a lot of new skills.

My personal notes? Let's see. No deductions for the figure of 8 u-turn test, i.e. no foot down or maneuvering outside the box. The swerve test turned out fine (eventually). I lost 2 points on the brake test (2 ft further) - I had managed to lock the rear of the Rebel in practice. And I lost 5 points on the timed curve for slowness though I was told my technique was perfect. So 93/100 for 3rd place in my group of 10. And I came out with a lot of respect for the skill of the motorcyclist who make things look easy or has beautiful technique.

The Southwest is a great place to ride a motorcycle. Distances are larger than what I can do on a road bike. For instance, 300 miles would literally take me all day on a road bike.

And every day, I see so many motorcycles being used for commuting - Americans no longer taking cheap gas for granted - though I can only see myself commuting on one if I have a running workout scheduled for the same day. Today, I spied these 8 motorbikes parked just behind the building I work in:


And they got me thinking about what kind of motorcycle I want. On some days, there is even some pretty exotic machinery...

Thursday, November 20, 2008

Nike+ iPod Nano and wireless headset

Over the last couple of years, I've been in search of my personal holy grail in terms of running-related gadgetry. In short, I've been looking for:
  1. the lightest and most compact iPod that
  2. supports the Nike+ sensor/running shoe hardware, and
  3. supports the use of a wire-free, sweatproof stereo headset
Before I describe the solution, let me briefly explain why this is hard to do.

Currently, only two members of the iPod family support the Nike+ sensor: the Touch 2G and the Nano (I have a 2G model). The smallest iPod is the Shuffle but it doesn't work with Nike+. The iPod Touch 2G comes with built-in support for Nike+ but is considerably more bulky than the Nano, plus I already have a iPhone 3G which is basically the same hardware as the Touch 2G plus a phone (and GPS). Unfortunately, the iPhone is not Nike+ compatible.

Next problem: the Nano doesn't support wireless stereo because it doesn't have a bluetooth chip. Actually, none of Apple's iPod/iPhone models can play music wirelessly even if the model happens to have bluetooth. Go figure.

This means a separate bluetooth dongle is necessary. Fact: there is only one dock connector per iPod. The Nike+ receiver uses the dock connector. The iPod Touch 2G has the Nike+ receiver built inside, freeing the dock connector for a bluetooth adaptor, but the Nano needs to have the Nike+ receiver plugged in at the bottom. Unfortunately, the headphone socket is also next to the dock connector at the bottom of the Nano. Severe competition for limited space:

I settled on a refurbished, i.e. 40% off, Jaybird JB-200 headset. It is sweatproof (very important for long-term use). It may also be ordered with an iPod-specific or a generic headphone plug dongle. (I got both.) It also has a microphone for regular bluetooth headset functionality. And mostly importantly, it also claimed a useful 5 hours of battery life, comfortably long enough for a marathon.

Even at a discount, these things are by no means cheap. And bluetooth's limited bandwidth does not make for audiophile or critical listening quality, but when I'm running do you think I care? (There are high-fidelity headsets based on Kleer's proprietary wireless system but they don't advertise sweatproofing and there are other downsides.)

Funny thing happened inbetween my placing the order and receiving the product. iLounge came out with a negative (C-) review. Given the cost, if it had come out a few days earlier, I probably wouldn't have ordered.

The headset is a bit fiddly but stayed securely put on my midweek ten mile run. And it's wonderful not to have wires to snag and yank your earbuds out.

There is a wire that connects the receiver on the right side to the left side. I had to shorten it using a tie-wrap so it wouldn't drag on my neck and interfere with head-turning.

The generic Jaybird dongle is plugged into the Nano 2g earphone socket with the Nike+ receiver inside my Marware Sportsuit Relay case (which doesn't appear on Marware's website anymore):

The Marware case is wonderful because it allow the Nano to be wrist-mounted - which is more comfortable than bicep-mounting - and is specifically designed to hold the Nike+ receiver as well. Since we've gone wireless, the constant flicking of the earphone cable is no longer a problem.

The generic dongle is about twice the size of the iPod docking connector dongle because headphone sockets don't supply necessary power, so it needs to have an internal battery. The combination looks rather unwieldy but crucially doesn't interfere with running.

Bluetooth reception from the wrist is excellent without annoying interruptions. (Placed in a pocket, you will get dropouts as body parts may temporarily block the signal while running.) Sound quality is running compatible: certainly, the Nike+ voice announcements come through loud and clear, and music does not require a low noise floor given labored breathing.

As for the iPod-specific dongle, I use that with my iPhone 3G for music only. The built-in bluetooth of the iPhone is only for calls.

There are a lot of pieces to lose. Here is the docking station for charging both the headset and the generic bluetooth dongle:

UPDATE: November 24th, I had some problems with the increase volume button, it seems stuck on, As of November 25th, the headset is dead. It charges (red light goes on and then off), but it doesn't turn on anymore.

Saturday, November 15, 2008

The desert and dynamic range: spherical panorama photography

I blogged about hiking on Pusch Peak back in April 2007):
It's hard to capture the scale and immersion of the canyons and peaks with conventional 2D camera technology. One day I plan to get a digital SLR and panohead and make 3D QT VR pictures.

I've since tried a few, small spherical panoramas projects, e.g. MIT's Stata Center and LA's Getty Museum. I've also tested my setup on the east coast in Virginia's Cumberland Gap but I haven't had the opportunity to follow through on Pusch Peak until recently.

So this autumn, I ascended the lower reaches of Pusch Peak with my spherical panorama gear. Unfortunately, the results are somewhat disappointing, revealing significant limitations of my equipment and process.

At altitudes of 1000m to 2000m, the strong desert sun here makes for unrelentingly harsh lighting (except during early mornings and dusk). In other words, rather challenging conditions for cameras, especially if one needs to capture a 360° view within a canyon at mid-afternoon, which will inevitably contain both brightly lit surfaces and deep shadows.

I'm using an Olympus E-510. And I've been taking jpeg images. As it turns out, the dynamic range of this combination has been tested to be well below par, see below:

This hasn't mattered until now.

It appears the solution, apart from getting a better camera, is to use RAW (not jpeg) images and maybe Adobe Camera Raw (ACR) to develop them. Assuming the test results translate well to the real world, I should be able to get nearly 3 stops more dynamic range without having to resort to bracketed exposures (for HDR etc.).

[Update: from discussion on dpreview.com, Jay Turberville pointed out that there must be something wrong with Imaging Resource's result for the E-510. The Olympus E-410, basically identical, tested out with a dynamic range of 5.99 on JPG. Still below par though.]

I will have to issue a promissory note here: to make time to ascend Pusch Peak again with my camera gear. And see if RAW will make a significant difference in real-world testing. (I'd also love to test a camera with state-of-the-art dynamic range but I don't know anyone with a Nikon and fisheye.)

Meanwhile, to illustrate the problem, here are the two least blown-out spherical panoramas from my first shoot.

The first panorama is from lower down on the hike. Since the sun is mostly hidden, this one came out the best:

pano1.mov (10.2MB file, use QuickTime player)
pano1.swf (Adobe Flash)

The second panorama was taken higher up. As you can see, I've diddled around with exposure curves a bit in an attempt to recover as much detail as possible but you can clearly see nasty artifacts such as banding in the sky.

pano3.mov (9.6MB)
pano3.swf (Adobe Flash)

Wednesday, October 29, 2008

New running shoes

Recently, my shins have started to ache on my runs. Shin splints are an overuse injury.

According to experts, this is a sure signal to buy new shoes as the cushioning is no longer effective.

I've accumulated only 200 miles or so rather than the expected 350-500 miles on my Nike Air Zoom Vomero 2+ but they're certainly over 6 months old.

To prolong the life of the old shoes would be false economy, as ignored shin pain can result in stress fractures. So today I went to the running store to pick up a new pair - or pairs, as you'll see presently...

Somewhat irritatingly, shoes manufacturers (like ski manufacturers) feel the need to update running shoes every single year. Sometimes it's only the graphics, other times there are significant morphological alterations. Fortunately, in the case of the Vomero, the fit hasn't changed although the sole have been updated. Voila, the Nike Air Zoom Vomero 3.

Another wierd phenomenon is that serious running shoes (current year) tend to be expensive and aren't discounted much off list if at all. You won't find the Vomero 3 for 30% off at places like Sports Authority. The list price is $125.

My first run today with the revised Vomero was a midweek 7.5 miler. I definitely detected improved cushioning over my worn Vomero 2+, though my shins still ached. Hopefully, the purchase wasn't too late, and ice and a NSAID will improve the situation.

At the same time as buying the Vomero 3, I happened to try the super-high-tech (and world's lightest) Nike Lunar Racer+ that was introduced to coincide with the Beijing Olympics. During the Olympics, I didn't notice any marathoners using it. In fact, it took me a while to locate the evidence on nbcolympics.com:

It's a mistake to go too light on running shoes since cushioning will be compromised. So I was a bit surprised to find it as soft as the supercushy Vomeros. That feeling comes solely from the new lightweight foam used. There is no cushioning whatever in the upper: no liner, no padded tongue. It's minimalist to the point of being almost transparent and as a result its weight is about half the Vomeros.

Of course, that meant I had to buy it as well. (The fit is a little different, I had to move up half-a-size.)

[L to R: Lunar Racer+, Vomero 3 and Vomero 2+]

As a recovering weight-weenie cyclist, I also find it surprising that at a list price of $100 it actually costs less than the heavier shoe. When it comes to cycling componentry, you always pay more for weight reduction, sometimes way more for a ridiculously insignificant percentage decrease.

Saving the weight of one shoe (0.33 kg) seems pretty significant until you realize I weigh somewhere in the range of 68-69 kg at present. In other words, I seriously doubt I will be able to see the effect of the shoe in terms of my running speed. And in any case, I'm not exactly elite athlete material.

Adding the Lunar Racer+ to my shoe collection represents a deeply embarassing personal statement of dedication and commitment to completing my run workouts come what may (modulo injuries) this semester. Shelling out another $100 on an event-only shoe (or at most a once-a-week-speedwork shoe) doesn't make practical sense.

And somewhat irrationally, I won't feel like lacing them up unless I feel I've earned my right to use them. And they won't make any measurable difference anyway. Go figure.

Monday, October 20, 2008

Running in San Francisco


Recently, I happened to be in San Francisco for a few days.

{Pic courtesy of Duffy Gillman]

What's the best way to see the city in a hurry?

One might think of their iconic cable cars, perhaps BART or buses.

Instead, I ran.

In two runs, I covered about 11 miles.
Both days were sunny.

There's definitely a runner's high to be felt pounding along the waterfront along San Francisco Bay and up and down those steep hills with great views.

Wish I could've stayed longer and gone further, e.g. do the Golden Gate bridge.

Routes

Starting out each time from near Union Square along Market St out to the Ferry House.
Then Run #1: turning right to head south along the Embarcadero looping around the SF Giants' AT&T Baseball Park and back. About 5.5 miles and mostly flat. (Found this route on the SFRRC's website.)

Or Run #2: turn left to head north along the Embarcadero to Fort Mason, but coming back along Taylor St over Russian Hill (with a view of Telegraph Hill and the Coit Tower to the left) and then Nob Hill. About 6 miles.

Bonus

One evening after dinner, I had the chance to cross the Levi Plaza and run up the Filbert Steps to the Coit tower in street clothing and shoes.

I felt like passing out but managed to snap two pictures with my iPhone camera (below).

Only two tenths of a mile according to Google Maps. Who needs a stairmaster and gym when you have this?

Sunday, September 7, 2008

SRAM Red 11-26 cassette

I used to be really into getting the latest and greatest components for my road bike. It was kind of a hobby of mine. An expression of my love for cycling as it were.

Now, I simply ride my bike and enjoy the scenery.
(See last entry on the matter here.)

However, recognizing that I no longer had the legs to ride a 23T up Mt Lemmon (even on a compact crank setup), I installed an SRAM Red 11-26 cassette this weekend. And it immediately took me back to my bike porn days.

I grabbed my DSLR to illustrate why before it got all greasy and encrusted with dirt:

Not only that it's a specially-made 10-speed steel cassette that is hollowed out to the point it weighs just 168g as measured on my scale (see below) but the fact that it comes in a (function-free) soft red bag is proof-positive this is a serious piece of chi-chi componentry.

Lightweight backpackers can probably appreciate that 168g is amazing light for all steel construction, especially when compared to a narrower range Shimano Dura-Ace 12-23 cassette with a mix of steel and titanium cogs riding on alloy carriers that weighs 184g on the same scale:

Functionality-wise, it's a direct drop in. Only sign I have it is the relatively subtle red plate on the back:

It works fine with the Shimano Dura-Ace chain. And shifts beautifully with a (satisfying?) clunk.

The weight savings is several orders of magnitude below any measureable threshold since I'm weighing in at 70kg plus. And in any case, I need a slightly longer (and heavier) chain.

The 26T, however, is the reason why I bought it. My legs can appreciate the slightly over 10% easier climbing it brings at the same cadence.

One thousand miles (and Griffin iTrip Autopilot review)

One thousand miles. To be a prisoner inside a steel cage for 14 hours with a singular focus on piling up the miles, listening to tunes.

Driving from Tucson to Boston back in January took me just over 4 days. I averaged a very comfortable 650 miles a day.
(See my blog entry and mile/fuel stats here.)

So why a thousand miles?

Well, on my return from Boston to Tucson, I lost a rear tire to debris and a travel day due to I-81 southbound being completely closed.

With the beginning of the semester approaching, I had to make up time. Heading west from just east of Little Rock AR after breakfast I managed to make it all the way to Las Cruces NM in 14 hours for an average of nearly 72 mph including stops.

Yup. A cool thousand, including all the way across Texas:

1000 miles and 14 hours wouldn't have been realistic parameters in the crowded Northeast but in the vast emptiness that is Texas, one can just set the cruise control and listen to music. Well, there was heavy stop-and-go traffic going through Dallas but that was the only trouble spot I encountered.

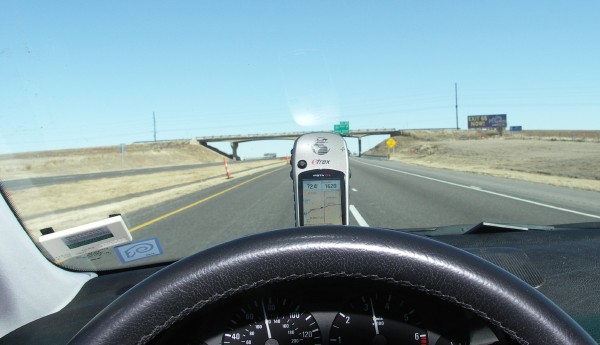
Speaking of music, I used my iPhone 3G for both iPod functionality and GPS navigation on this trip. Mounting options include simply placing the phone sideways in the instrument binnacle (displaying GPS-enabled Google maps):

or using a generic vent mount (from aWalmart Supercenter) - here in iPod mode:

Compare this to what I did with my Garmin Etrex back in January here.)

To interface with the aux input-free Harman Kardon sound system in my car and to feed the battery-hungry beast that is the iPhone 3G, I used a Griffin iTrip Autopilot FM radio transmitter and charger that I purchased at the Cambridgeside Apple store for this purpose. A vital accessory on a 14 hour day.

I was pretty happy with the FM transmitter part because the iTrip Autopilot can be set in extended FM frequency range (76.0-108.0MHz) for international (i.e. non-US) use. Furthermore, my car was sold in multiple markets with the same radio/cd player. This means the radio can be rebooted in Japan FM mode (76.0-90.0 MHz) via the service menu and tuned down to an empty 76.0MHz here in the US. The sound quality is markedly better than in the regular noisy FM band here.
(For those of you who are not familiar with car radio FM transmitters, settling on an unoccupied, i.e. interference-free, frequency on FM can be a rather frustrating experience.)

BMW Business CD service menu access: turn radio off then on. Hold down the m button for ten seconds, +/- buttons to find Area, preset 1 to flip through the areas, select Japan, then +/- reboots.
Griffin iTrip Autopilot extended frequency range: hold down center key until logo shifts position.

Unfortunately, I was less happy with the charging function of the iTrip Autopilot. To my dismay, my iPhone actually discharged despite being plugged in!

I opened a ticket with Griffin Tech Support:
[ME] Unfortunately, I've discovered there is a big problem with the itrip autopilot. Sometimes it doesn't give enough power to the iPhone 3G, esp. when the maps/gps is running and the ipod functions are playing to charge the iphone 3g. Worse still, when these functions are running, the iphone 3g actually discharges! As a result, i get warnings that it's down to 20% power etc. when I started with a full charge before plugging it into the itrip autopilot.
The reply?
[Technical Support]This will happen if the iPhone is running multiple applications like you are on your trip. If you dim the iPhone screen a little, this will help. A good analogy would be... you're burning gas faster than you can fill up your tank. Does that make sense?
Follow-up:
[ME]but I thought you'd have a version with a beefier power supply for the iphone 3g. It's wierd to plug it in and end up with a discharged battery. Like if I plug in my macbook and run lots of applications, I don't expect the batttery to run down.
I gave up after the next reply:
[Technical Support]True, but its much different when you're talking about AC compared to DC. Thank you.
Well,in my opinion this is a product defect. All I have to say is watch out if you buy the iTrip Autopilot: you may end up with a discharged iPhone 3G because the power supply is too wimpy and there is no warning of this anywhere in the product packaging.