Saturday, December 25, 2010

Shenzhen Ping Pong: Li Jun at the Pacific club

In this increasingly homogenized world, minority styles are at a premium. For example, it's really difficult to find good choppers to loop against. Therefore this winter break, I was grateful for the opportunity to hit with Li Jun (李君) at the Pacific club while visiting Shenzhen.

She is a high-level chopper with Friendship 802 short pips with thin sponge on the red side (backhand) and inverted on the black side (forehand). Having resided in Belgium for a while, she speaks English (some Flemish as well) and understands my Cantonese. (I don't speak Mandarin unfortunately.) She was also ladies singles champion while in Belgium.

The so-called Pacific club, is officially called the 友傳乒乓城. It is conveniently located near the Mix City (万象城) shopping area in Luo Hu (罗湖). However, people know it as the Pacific club because of the name of the building in which it resides.

It has excellent air-conditioning (necessary for humid and hot summers in Southern China) and a range of court sizes. The cost (aka table fee) for one of the larger individually barriered courts ranges from around 40 to 55 RMB an hour: actual price depending on peak/off-peak demand. Of course, a large court is needed for the chopping game. (For comparison, an individually barriered court at the Shenzhen Century South China Table Tennis Club (深圳市世纪南华乒乓球俱乐部) that I've blogged about previously costs from 20 to 38 RMB per hour.)

In addition to the table fee, one must pay the coaching fee. In the case of Li Jun, she charges 100 RMB per hour. A reasonable practice session would range from 90 minutes to 2.5 hours. One needs about 20 minutes to warm up. And then looping 4 or 5 baskets of balls will take up the rest of the 2 hours. You can do the math.

First, let's warm up the forehand.

(Direct link to the video here.)

And then, the reverse penhold backhand.

(Direct link to the video here.)

As to be expected, you can probably see that my reverse penhold stroke has evolved a bit since my previous posts on the topic. (I may take the opportunity to blog about the technical changes involved next time.)

Finally, we are ready to loop for an hour or two. First, looping on the forehand diagonal.

(Direct link to the video here.)

Some background is appropriate at this point. I first learned to loop with short pips a long time ago. Despite switching to inverted at 1900 level, and progressing to a pretty solid 2100 rating years ago, the underpinnings of that loop with all its warts visible here (which currently hold me back) can be traced back to my first short pips experience.

In short, I'm attempting to dump and re-tool my forehand loop. (Yes, I want to get rid of that same loop stroke that got me over 2000.) However, years of inappropriate reinforcement has meant that change has been particularly hard to come by without impacting power and spin in a major way. In particular, the ingrained timing and over-large backswing that I have developed has been a barrier to progress. It's gonna take a lot of effort to re-program my muscle memory. Looping against chop is an excellent way to overwrite that muscle memory.

So on this visit, my plan was to play Li Jun every other day. This gives sufficient recovery time and also time to review the recorded video, and think about stroke changes. Since her chop is pretty high level, one must be able to loop a pretty strong ball even to put it on the table, and definitely a very strong ball if it's to challenge her chop. So there always pressure on the the looper. And under pressure, I tend to revert to old habits that die hard. Still, one must swim against the current sometimes... in order to spawn something better...
Thursday, December 9, 2010

Heart Rate Drift and Rate of Perceived Exertion

I'm what you might call a bit of a data junkie, but curiously enough I normally don't use a heart rate (HR) monitor. Let me explain.

On my road bike (or Computrainer stationary trainer), I have a powermeter that measures my output wattage (or workload). On the treadmill, I simply run at a fixed speed. For a given workout, I set the target wattage or treadmill speed manually and doggedly stick to it. Based on the rate of perceived exertion (RPE), I adjust the workout if necessary for next time. The HR falls wherever it may.

But that was before I acquired an iPod Nano 6G back in September (see blog post here). The 6th generation Nano not only records foot pod data but also can simultaneously record HR. Since then, I've been wearing my HR strap on treadmill workouts.

I ran twice earlier this week (Monday and Wednesday) on a treadmill in a very large, climate-controlled gym. There is a completely predictable and repeatable 20 beats-per-minute (bpm) rise in HR over the 50 min or so endurance run. See how remarkably similar the two profiles look below.

[Conditions: The treadmill speed was fixed to a lowly 7.0 mph (11.25 km/h) throughout each entire workout. (There is also a 5 min warm-up before the start that's not shown here.) The climate conditions in the gym were unchanging and perfect throughout. Also, I took a sip of water every 5 minutes like clockwork.]

So the HR drifts. Observable phenomenon confirmed. But what about perceived exertion?

Well, perceived exertion is actually also another pretty dodgy fish. Perhaps it's generally correlated with breathing rate in running but I'm not sure. But initially, I've noticed my RPE is relatively high during the first 10 minutes (despite the 5 min warm-up). I don't feel efficient. But I'm not breathing hard. After that, the RPE actually drops despite the HR steadily drifting upwards. I feel I am in the groove, so to speak. Nearer the end of the workout, I've noticed when my HR hits 168 bpm or so, I start to feel the RPE go up again. However, in neither workout did I exercise to exhaustion, or have to reduce the treadmill speed to accommodate fatigue.

So what can I conclude? If I go by RPE, I'd be adjusting the treadmill speed down, then back up and back down again. If I go by HR, I'd be steadily reducing treadmill speed as the workout proceeds. In the end, I think all of this is really just data for data's sake. There's a lot to say for just ignoring these indicators, beloved of coaches and exercise physiologists, i.e. leave those two up and down buttons alone, and just doing the damn workout and burn your way through those 700 kcal.

Tuesday, December 7, 2010

Shenzhen Ping Pong: the penhold grip

In table tennis, the penhold (or spoon) grip is the less common of the two major ways in which to grip the paddle. The self-descriptive shakehands grip is dominant in modern play. Shakehands offers particular advantages for two-winged attack that the traditionally one-sided penhold grip lacks, requiring instead excellent footwork to compensate.

However, in the last couple of decades, innovation in the form of the reverse (side) backhand has allowed modern penhold to compete with the backhand loop of the shakehands grip. In previous relevant entries in this blog, I have documented my attempts to acquire that reverse penhold backhand.

I (un)lucked into the penhold grip by accident. Many decades ago, someone with good intentions gifted me a Chinese-made, one-sided Double Happiness penhold paddle of the kind sold in department stores. It had short pips-out rubber on one side and merely painted wood on the other. Because of a grip size difference, blades for penhold and shakehands also typically have different handles: in particular, penhold handles are too short to hold comfortably with the shakehands grip. As they say, the rest is history: I'm stuck with penhold.

An interesting fact about the human wrist joint is that it has a remarkably limited range of motion. The wrist is really only capable of a limited amount of natural rotation (relatively unstressed) about the cylindrical axis. You can rotate the hand relatively far clockwise but not very far at all anticlockwise (without co-opting the elbow). The hinge at the base of the palm allows the hand to tilt (or "cock") forwards or backhands in addition to the rotation. Furthermore, it's abundantly clear that there is considerable variation in the degree of flexibility exhibited by different players. Small changes in how one grips the paddle can mean large differences in available paddle angle. And differences at the wrist can require (undesirable) larger compensatory differences at the elbow and shoulder. A little sad perhaps, but I can safely report I made it from absolute beginner to 2100 level in the 1990s without really knowing how hold a penhold paddle properly.

Although improvements have been forthcoming, I still cannot state with certainty that I know how to hold the paddle correctly. Having said that, I believe the correct way is to grip the paddle between the thumb and the back three fingers. Obviously, the handle fits in the valley between the thumb and index finger (section 2). But aside from that, a range of subtle but significant adjustments seems possible. The index finger is free to close around the handle or relax and slide away from the center of blade, therefore widening the grip to achieve a more vertical paddle angle when the reverse backhand is deployed. Straightening the back fingers a bit (at least the middle finger) also seems to help with the reverse block/punch stroke. Rotation of the wrist clockwise about the cylindrical axis of the forearm is also critical to helping keep the reverse penhold open and aligned parallel to the table endline. (Otherwise, it seems the natural resting angle points perhaps 45 degrees too far to the right.) In terms of the forehand stroke, straightening the back fingers seems detrimental to a natural followthrough and therefore achievable power. (I find its effect can be felt as awkwardness at the elbow.) One must either fix on a compromise position or be able to execute subtle shifts in finger positioning on the fly. Experimentation is necessary, plus (as I mentioned earlier) some people have much greater wrist flexibility than others.

As for the paddle, the Chinese handle itself seems largely standardized between manufacturers. (The Japanese/Korean and twiddler penhold handles are another topic entirely.) I have made some measurements with calipers that seem to confirm relative standardization. Comfort and fatigue are especially critical issues for reverse backhand penholders who need to put rubber on both sides of the paddle. The resulting paddle is oftentimes nearly as heavy as shakehand paddles, despite having a shorter handle.

For example, here is the Chinese-made Sword blade I've been playing with since I resumed the game until very recently. I find this handle extremely comfortable with minimal customization. It weighs about 188g complete. Only change has been to smooth the sharp edges at the neck of the paddle on both sides. Of course, comfort is individual, given possible variation in hand size.

I recently switched to a Butterfly Amultart blade. This blade is heavier and much faster than the Sword. I weighed two samples at 94g and 90g, respectively. Incidentally or not, it seems to partner Tenergy 05 extremely well (as long as one has the skill level to handle the extra speed, somewhat debatable given my circa 2100 level of play). Outwardly, the unmodified handle is dimensionally extremely similar to the Sword but I found it "too big" and strangely uncomfortably.

After a few weeks of trying to get accustomed to the Amultart blade, I had to carefully modify the handle (over a period of several days) using a Dremel tool to "thin" the center section down to 25.4mm to comfortably accommodate the knuckle area (shown as section 1, top picture) and thumb. I also had to "scallop out" the underside of the handle (for section 2, top picture). Initially, I was puzzled by this. But experiments with an identical Butterfly handle with a thinner center section confirmed to me that the extra core thickness of the Amultart blade was responsible. We're talking just a few mm, but the differences in grip feel substantial and significant. (Incidentally, that other blade was a penhold Innerforce ZL Carbon, which is lighter and plays slower than Amultart, but seems to be another stellar offering from Butterfly.)

Modifications are shown in detail below (1: top/side, 2: top, 3: side, 4: underside).

Note: I have included a small cut out for the thumb on top of the blade.

Update

There exist penhold blades with special handles designed to facilitate use of the reverse backhand. I am grateful to those who brought my attention to the Gushi (古氏) and Sanwei (三维) designs below.

Saturday, September 18, 2010

Back on the bike

It has been about a year and a half off my bike. Last week, I decided to bike commute instead of driving. Hence the bike-specific Trek pack with back ventilation (holding work clothing). Had to look long and hard for my custom bicycling shoes, primary (Di Notte) and backup (Blackburn Flea) lighting. Yep, it has been so long I've forgotten where I stash my bike gear. Other fumbles were I had to use primary AA cells in my Di Notte headlight, my NiMh rechargeables were 6 hours away from being recharged. My Powercontrol head unit from the SRM powermeter was not taking a charge. I hate when I have to send that overpriced unit back to Colorado for servicing. Damn, have to do without data for this commute. Mind you, it's probably a blessing I don't see the numbers.

Temperatures were in the mid-90s to 100F (about 35C-38C). About 32 miles round-trip. Listened to Squeeze on my tiny new iPod Nano (6th generation) on the trip down. Showered at the gym and went to work.

However, by about 5pm, I was suddenly seized by what I thought was a mid-afternoon malaise. Downed two espressos from my Nespresso machine in my office. Headed out the door at 6. Suddenly I noticed I was crawling along in my small chainring. I diagnosed a delayed bonk. Stopped at a Circle-K, downed a 32oz gatorade, and resumed pedaling towards the foothills. But things didn't get better. In fact, they got quite a bit worse. I had to climb in my 34 x 26 gear on a moderate but long hill. I revised my diagnosis to be dehydration and electrolyte depletion.

That night, I threw up. Next day, I had an all day headache and high fever. Couldn't hold solid food. Lost a kilo.

I guess it was the Bicycling Gods way of punishing me for being off the bike so long. To be humbled on your own commute.

It's funny, I never expected to have problems completing the commute since I kept it simple and just spun, never encountering an aerobically-challenged moment during the commute. But I only had iced water, nothing to replace the electrolytes. Not a smart thing to do when it's still effectively summer, temperature-wise. Also having run 10K on the treadmill the previous evening probably didn't allow my muscles enough time to fully replenish its glycogen stores.

Tuesday, September 14, 2010

iPod Nano 6g

There can be a manufactured silver lining in every cloud.

For example, last weekend, I misplaced my iPod Nano (4g: 4th generation) that I use to record my runs using the Nike+ sports kit. I'm also out of shape, read: can't run 10K under 45 minutes anymore, and need some retail therapy to jumpstart my training.

Coincidentally, last week Apple released the new 6th generation (6g) iPod Nano which advances on my now-lost 4g Nano in two distinct ways:
  1. It's much smaller and has a clip much like the previous generation Shuttle. It's square and is all touch screen. No more iPod iconic click/scroll wheel. Feels like half the size and weight of the previous (rectangular) Nano. Read: easier to carry on runs.

    (Incidentally, the Shuttle has never been Nike+ Sports kit compatible.)
  2. It's also compatible with the Polar Wearlink+ Heart Rate (HR) monitor strap. The 4g wasn't. (The 5th generation (5g) Nano was also compatible, but I skipped the 5g.)
The major downside of course is that I'm out a total of $266 after tax. For that, I got the base model 8GB Nano $149 plus the $29 Nike+ sports kit, plus the $70 for the Polar Wearlink+ strap.

(Incidentally, you need a very special Polar Wearlink+ strap that transmits on two separate frequencies 5 kHz and 2.4 GHz. Only one of the frequencies is used by the Nano (2.4 GHz) but it transmits on both simultaneously. Regular 5 kHz Polar HR monitors don't transmit on the frequency needed by the Nano. Yes, it's only the most expensive model that has the red Nike+ logo on the transmitter.)

I think the square shape is great and I'm all for minimalism. But of course, the overall effect is spoiled by having to insert that big white Nike+ dongle into the dock connector. (On later iPod Touch and iPhone 3GS onwards, the dongle is unnecessary.)

Another (post-purchase) downside I discovered over the 4g is that the 6g only displays the time elapsed during a Basic Run. The screen is nearly the same size, I wonder why they deleted the extra useful real-time information in the Nike+ application.

Unfortunately, to get to that other information being recorded, e.g. pace, distance and HR, it's necessary to be wearing earphones and to press the Sleep/Wake button to get a voice readout. Well, at least one can get the cute Heart logo and stats in the summary after End Workout.

My Nike+ account now also has that cute Heart displayed on runs that have recorded HR.

Unfortunately, recorded HR makes for some extremely weird-looking and virtually-impossible-to-interpret, totally physical-universe-defying run pace graphs.

Oh well. Two steps forward and one step back in functionality.

Sunday, August 22, 2010

A Ping Pong Palace

Many contemporary houses or lofts offer high ceilings and the promise of open space. And the opportunity to explore the flex room concept.

I recently decided to give some thought to organizing my living room so that it could be transformed into a space for playing table tennis (and back again) in a matter of minutes.

The requirements for table tennis are quite simple. Enough space to put a table (9' x 5') and have room to move about (in my opinion, bare minimum playable dimensions should be at least 3 table lengths and 3 table widths: although the width is fine, most two car garages (20' x 20') are therefore not long enough).


[Variety of minimum dimensions for the playing area, from recreational through to international level events.]

The space has to be extremely well lit (beyond typical residential levels): lighting should be well controlled, i.e. even (no shadows, overly bright or dark spots) and glare-free. Floor should be even and durable enough to withstand gym shoe pounding and be easy to clean. And neither be too slippery (as with dusty concrete or ceramic tile) nor have too much friction (as with carpeting or rubber mats). For multiple ball training use, barriers or screens are needed to stop balls from marking walls or disappearing into hard-to-reach areas. Depending on geographical zones, the playing area might need to be completely climate controlled.

Sure you could play in a basement or garage but low ceilings can restrict lighting choices and any support columns can interfere with play. Moreover, those areas are not usually climate controlled and dust can be a major problem. A dedicated, purpose-built gym room would be the gold standard, but let's suppose you want to explore the flex room concept without making your living room look like a garage. Here is what I came up with:

Details are as follows:
  • Lighting: Two rows of indirect/direct light fixtures suspended 2' off the ceiling (source: Architectural Indirect Version 4, H.E. Williams Inc). Spaced so you don't see the lights directly when at the table looking up. Each row contains 6 end-to-end interlocking 4ft units. 3 T8 high performance fluorescent 32W tubes are mounted per fixture. Designed for about 700 lumens at the table. Wattage: 1152W total.
  • Table: A folding rollaway Butterfly Centrefold 25 table (US Open 2010 model). Color blue. Japan-sourced Butterfly International net set. Color blue.
  • Floor: Sealed slate tile floor. (No Gerflor here.)
  • Ball barriers:There is a (removable) retractable clotheslines reel (source: Home Depot) hanging across the home entertainment center end of the room. (You can see it just above the sake bottle-styled lamp.) It supports a super-lightweight black (nylon) plastic mesh net (6' high x 20' wide, made of 0.5cm squares, weighing less than 1 lb, source: Tokyu Hands). At the other end of the room is a floor to ceiling screen (12' high x 20' wide) operated via a hand crank, see below.
  • Robot: Y&T S-27 from China. Not shown.
A first evening for the facility, inviting friends around to play, eat watermelon and drink chinese tea:

Here is a time-lapse video of the room transformation from living area into ping pong palace.

(All pictures except the first taken using the Panasonic Lumix 8mm f/3.5 micro-4/3rds fisheye lens on my Olympus E-P1.)

Monday, April 19, 2010

Shenzhen Ping Pong: Doha!

Last November I spent a month in Doha, Qatar and couldn't find anyone to practice with. So when I returned I decided to make a blog entry (see here) lamenting the lack of ping pong there: the purpose being to garner Google hits for keywords "table tennis" and "Doha".

Well, the power of the internet should not be underestimated!

(For the record, Ashish, a fellow table tennis enthusiast currently working at Hamad Medical, and I played at the Qatar Bowling Center for an hour and half. The table fee there is 20 rials/hour.)

I wonder what the Olympic rings are doing there at the bowling center?

Update: Ping Pong paddle considered dangerous!

Leaving from Doha airport, my hand luggage was searched at the gate by Qatar Police. This was an additional security check since I was traveling to the United States.

I was most surprised to find that my ping pong paddle was singled out and removed. I was told it couldn't be carried aboard. A dangerous weapon perhaps? Go figure: my loop isn't good enough yet... Anyway, it had to be checked in separately as another piece of luggage.

So strange! Not even in the paranoid USA did the TSA cared even about my paddle...

Thursday, April 15, 2010

Run video: University of Arizona Mall Loop

(picture, courtesy of Luise Betterton)

Some runs are just flat out gorgeous with spectacular scenery, exotic locations or weather. Running outdoors becomes a little easier. Time passes a little faster than on most daily runs, not to mention treadmill workouts.

I've been searching for some way to retain those moments, so I've been interested in capturing video footage of my favorite runs.

The main problem is that it's rather difficult to run and carry a video camera at the same time. Running requires coordination, and the counterbalanced swinging of arms. With a video camera, attention is diverted from the mechanics of running, and additional unsecured weight is likely throw a runner off his/her stride. And even if I could pull off pointing a video camera while running, the footage is likely to be unusably jerky.

Solutions include driving the course or mounting the camera on a bicycle, since vehicles have air-filled tires and in some cases, suspension, that would mitigate against bumps. But it's not always possible to drive the same course, and especially when one is traveling, limited time and opportunity may preclude revisiting the same location.

(I've attempted to film a course while holding the camera in one hand while riding a bicycle. But I wasn't so happy with the results, see my youtube video Along the Corniche in Doha, Qatar here.)

With another trip to exotic Doha on the horizon, I decided to pick up a GoPro HD Hero video camera (pictured above). It is designed for the action video market and thus is available with a large variety of mounting options. The chest harness is what got me thinking it might just work for running. It's waterproof (well, at least sweat resistant) and very small and lightweight. Also it comes equipped with a wide angle lens, another essential feature. It doesn't have image stabilization, but iMovie 9 can import and apply post-hoc stabilization at the cost of a slightly narrower angle of view.

I decided to test it back home in Arizona first. Here is a one minute (accelerated) video of my first test run around the Mall at the University of Arizona's main campus. (The loop is 1.3 miles long, so it actually took me 9'55" to run.)


(Direct link here.)

As you can see, despite the HD (High Definition) label, the quality is definitely not as good as my HD cameras. And the glare from the sun on the return part of the loop is a big problem with the wide angle lens. Another unanticipated problem is that chest-mounting means that the arms intrude into the video frame. I will test head mounting next.

Thursday, April 8, 2010

Shenzhen Ping Pong: adding serve to the drills

This is a follow-up to the previous blog entry (here) about the two to the backhand, one to the forehand drill - aka the Falkenburg drill.

Most drills are just that: simply drills. In other words, doing a drill isn't like playing a point.

Performing a drill competently doesn't necessarily translate well into game play. Sometimes this can be rather frustrating: especially when what we practice doesn't work when we encounter the same situation during point play. For amateurs like myself, this can seem very discouraging and make the drills seem rather pointless.

To counteract this situation, one can simply integrate elements of point play into a drill. Here what follows is a two stage approach.

It looks rather complicated but stage 2 is just the same footwork drill as before: 2 to the backhand (to be taken with the backhand followed by the forehand, respectively), followed by 1 to the forehand.

Stage 1 will segue into Stage 2 but begins by
(1) you serving underspin.
(2) Your partner pushes the ball back to your backhand.
(3) you forehand loop it into his backhand.
(4) He blocks down the line into your forehand.
(5) You forehand loop down the line.
And (6) he blocks back to your backhand. And then Stage 2 ensues.

In stage 2:
(7) you backhand drive cross-court to his backhand.
(8) He blocks it straight back to you.
(9) You forehand loop from the backhand side.
(10) He blocks down the line.
(11) You forehand loop down the line. And repeat from step (7).

(Note it's not so complicated for the partner. All he has to do is simply repeatedly block two to the backhand, one to the forehand except for that initial push return of serve to the backhand.)

I think it's considerably easier to watch than to describe. Let's go to the video:

(Direct link here.)

This complication (stage 1) gives the footwork drill the flavor of playing points.

Wednesday, March 31, 2010

Shenzhen Ping Pong: adding footwork to the drills

In table tennis, mobility is critical in games. Being able to move means one can take the initiative to attack and put your opponent under pressure. Being able to move also increases your options in terms of shot selection. Finally, being able to move means being able to hit the ball correctly and consistently when the incoming ball is not perfectly placed.

Therefore acquiring decent footwork is of extreme importance.

Ingraining a new stroke into muscle memory begins with drills (isolating that specific stroke) from a stable but static position, e.g. the backhand can be initially developed by hitting only backhands from a known, fixed position.

One can progress from there to integrate the new stroke with others. For example, my previous blog entry (see here) explores a drill for alternating the reverse penhold backhand stroke with the forehand.

A third step (and the topic of this blog entry) would be to throw in footwork into the mix as well. This puts additional pressure on proper stroke execution. Not only do you need to be able to execute the same stroke as in the static drills, but proper setup and recovery (in terms of feet and body position) are additional burdens that you need to tackle and successfully execute. And since errors will compound, these drills are especially demanding.

Let's begin with a two-one backhand/forehand drill. As the diagram indicates, this is a sequence of three strokes, two to the backhand side and one to the forehand. On the backhand side, first ball should to be taken with the reverse penhold backhand, the second with the forehand after stepping aside. Then move to the forehand side to take the third ball. Finally, you must make the return quickly to take the first ball of the next sequence with your backhand. (This version of the drill is also known as the Falkenburg Drill: thanks Kitt!)

Obviously, the additional degree of difficulty over the previous drill comes from the footwork required. (If you revisit the previous blog entry and look at my feet, you'll notice it's possible - but not necessarily optimal - to do the one ball to each side drill with very minimal footwork.)

Let's go to the video: (Direct link here.)

Hmm, my form is not great. I will expand this blog post when I have better videos and show variations on the drill...

Double Happiness practice balls:

(You need to find a practice partner who can direct his block reasonably accurately to both sides, at least initially until you get really good at the drill. I thank my friend Hideya Watanabe here for doing an admirable job.)

Saturday, February 27, 2010

Tokyo Marathon 2010

It was a cold, wet and windy Tokyo Marathon.

The weather forecast called for rain in the morning that would stop come afternoon. Well, of course, it rained during the entire marathon, quite miserably (in my opinion) during the line up in the starting area until the official start at 9:10am. As the records confirm, needless to say, the rain stopped and the sun came out around the time I crossed the finishing line in waterlogged running shoes and soggy socks and shorts.

Fortunately, I'd stopped to buy a lightweight, transparent Asics shell at the marathon expo a couple of days earlier when I picked up my bib and timing chip. Plus a yellow head covering and gloves from a 100 yen store. Otherwise, I would have froze.

Still, despite the conditions, I don't think anyone would want to punt on this event. After all 272,134 people applied for just 32,000 spots. As it turns out, the completion rate was 97.0% for men, and 95.1% for women. Amazing.

The event is professionally run and extremely well supported by over 10,000 volunteers. Can't fault anything about the event save having to line up and stand in the cold rain for 45 minutes before the start.

Nearing the finish line: I'm told someone finished in a bikini just 10 minutes ahead of me. You're pulling my leg, I don't believe a word of it...

And I think I had a decent run. The official results aren't out yet, but if my iPod Nano is to be trusted, I ran a very steady pace for a time around 3 hours and 45 mins.

As the finish line photograph shows, gun time was 3:48 but since I was in the Cs, it took maybe 3 mins or so before I crossed the start line.

And so 3:45 despite losing about 5 mins waiting in line for a porta potty at km 25 (you can see the dip in the graph). I'm happy.

Update: (June) I received my official finisher's certificate in the mail. Chip time was 3:44:42. Gun time was 3:48:06.

(The graph also takes a big dip at the end because my numb fingers fumbled for a while before I managed to terminate the workout after crossing the finish line.)

In fact, (for a change) I'm actually quite pleased considering the conditions and the fact I haven't managed to run outside for nearly 9 weeks. Lack of time due to work and other priorities have restricted me to short treadmill workouts at the local Konami gym.

I didn't have to walk, my lower back didn't bother me, I didn't cramp, I didn't bonk. For the latter fact, I'm grateful to Sasha Woolson for mailing me Strawberry Clif Bloks all the way from the United States. (I've not able to find them in Tokyo.) My Newton running shoes that I got back in December were simply great. (My feet were cold despite double layering of socks but that's not the fault of the running shoes.)

At the finish line, besides the finisher's medal (in exchange for returning the timing chip) and souvenir towel, they hand you an Amino-Value BCAA 4000mg sports drink, bottled water (Tokyo Metropolitan), mikan (蜜柑) = satsuma, banana, a Soy Joy bar, Calorie Mate pouch and even onigiri(御握り) = rice balls (flavors: sake(鮭) = salmon and mentaiko (明太子) = pollock roe). I even saw a sign for a foot bath (足湯). And I probably missed a few other goodies. They even search for and personally hand you your clothing kit bag that was dropped off at the start.

Also, although my BMI is nothing to write home about, I sincerely believe another key factor is that I managed to lose nearly 8 lbs since the Tucson Marathon back in December.

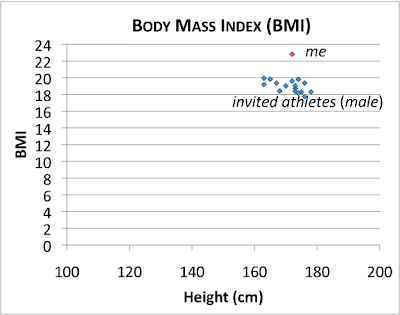
See chart where I've plotted Body Mass Index (BMI) vs height in cm for the invited athletes. As you can see those guys fall neatly in a narrow band between 18 and 20.

For comparison, the red dot is me (172 cm, 67.5 kg, BMI=23). And given my body type, it's not really realistic for me to lose much more weight. Personally, 65.0 kg is probably the absolute limit without getting sick all the time. I'll never be able to make the BMI 20 class. And let's not talk about aerobic capacity either...

But endurance is highly trainable. So I can definitely see room for improvement and possibilities for the future...

Saturday, February 6, 2010

Shenzhen Ping Pong: drills for integrating the reverse penhold stroke

As an amateur I find it's sometimes frustratingly hard to make fundamental changes to my table tennis game. Sometimes it seems completely futile. No matter how many times I'm told I'm not doing it right, despite my best efforts, I'm repeating the same errors over and over again, especially when under pressure.

Table tennis is a fast game. Good reflexes and muscle memory are activated when we play shots. Since muscle memory is largely automatic, and many of us amateurs did not learn the strokes correctly to begin with, e.g. not everyone hits like Lu Yan (see here), changes to the way we hit the ball will involve substantial re-programming.

Therefore, when it comes to a new stroke, formal drills are a good first step towards proper integration.

In my case, learning the reverse penhold stroke (see summary of posts here) has changed not just my backhand, but has also revealed fundamental weaknesses in other strokes.

In other words, one has to take a totally holistic approach to the game. And thus a single change may involve a cascade of additional changes in order to take advantage of the new stroke.

One year ago, I went to Shenzhen to learn the new reverse penhold backhand only. Although I knew my (far from perfect) forehand loop had its quirks and limitations, I did not think it was the limiter in my game. I did not anticipate having to completely re-work it to accommodate the use of the backhand.

My approach has been to visit the Shenzhen Century South China Table Tennis Club (深圳市世纪南华乒乓球俱乐部), record my practice sessions, study (i.e. attempt to understand) and try to incorporate suggested modifications and improvements back home.

One doesn't necessarily need a professional coach to do the drills. Not every ball has to come back. A box of balls and a patient practice partner will do. Assuming one knows what to look for, I found video review to be invaluable in helping to close the gap between what I believe I was doing and what actually happened out there.

Here is a pair of drills I used. The venue is Warabi (蕨) municipal sports center, just outside Tokyo. I try to implement the lessons from Shenzhen through twice weekly practices with my friend Hideya Watanabe.

Let's go to the videos. First up, forehand/backhand to the practice partner's forehand. (He blocks alternately, one to each side.)

(Link (Link here.)

Second, forehand/backhand to the practice partner's backhand.

(Link here.)

Remember earlier I said I had to change my forehand stroke completely? Compare the above video with the following drill recorded 4 month earlier (from prior blog post here).

(Link here.)

Can you spot the key differences?

Update:

Video was recorded using a Panasonic DMC-TZ7 in HD mode (1280 x 720p) in the corner of the court at the widest possible angle available for the camera, a focal length of 24mm-equivalent for 35mm format. The difference between the two setups shown is one of height.

By using a center column extension such as those made by Habuka, one can increase the height of the camera from 1.5m to over 2m for a better position without buying an expensive, tall tripod with a huge footprint. (You can compare the relative heights relative to the notices on the back wall.)

Since the Panasonic compact only weighs in at about 220g, this does not make the tripod unstable.

The 1 minute forehand/backhand to the backhand drill below is an updated video clip taken at the higher camera position.
(Link here.)

Can you spot how my stroke has evolved from the earlier videos?

Tuesday, January 26, 2010

Shenzhen Ping Pong: the way things should be

I was back in Shenzhen for a few days a year after my first visit to garner more knowledge, record more video (using my new Panasonic Lumix DMC-ZS3) and grunt my way through a bit more training. Once in a while, like a moment of clarity that follows after a storm blows through before the everyday haze we have become inured to is restored, something comes through like a breath of fresh air to remind us of the ways things should be.


(Link to video in a separate page here.)

On the last day, while practising a few tables away, I recorded just 45 seconds of video of professional coach Lu Yan (陆炎) looping to a customer at the Shenzhen Century South China Table Tennis Club (深圳市世纪南华乒乓球俱乐部), a place that I've posted quite a bit about. It's only 45 seconds, but it should be obvious Lu Yan has great technique. As someone correctly told me, one can easily fall in love with the sheer perfection of his swing.

Wouldn't it be wonderful if we could all learn to hit like that?